

How To Repair Leaky Brake Line Connection
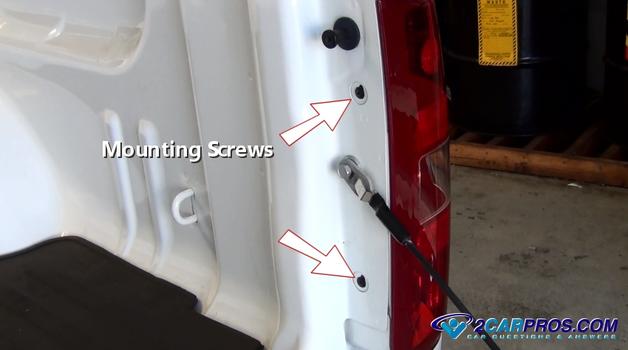
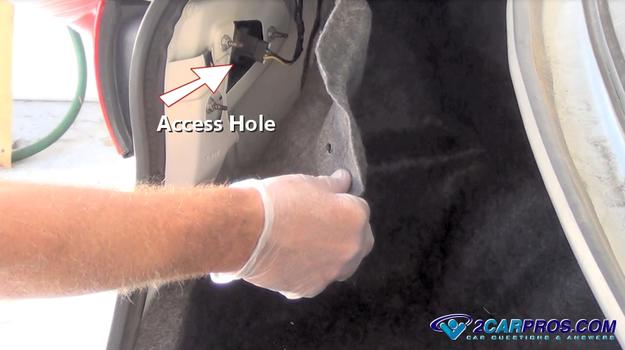
This guide covers a elementary bulb replacement and continues onto testing the brake calorie-free electrical system. The brake calorie-free organisation is a simple on and off exterior lighting system which is controlled by a restriction low-cal switch located near the pinnacle of the brake pedal. A simple wiring circuit is connected to the car's BCM and and then onto the rear restriction lamps (older cars practice non use a BCM - body control module). This system is powered and protected by a fuse located inside the fuse panel under the dash or the ability distribution centre located under the hood. When the brake pedal is depressed by the driver the restriction light switch completes an electrical circuit. This is achieved by the switch plunger resting against the pedal arm. A finish lite switch is designed in the reverse way of a normal switch considering when the switch has contact by the pedal information technology is off, and when pedal is depressed the switch is on. This switch uses a ground trigger for BCM which will turn on the ability for the iii brake lights. On older vehicles the switch connects power to the brake lights directly. Some German build cars use a lighting control module in place of a BCM. A brake lamp switch is designed to piece of work with at to the lowest degree two wires and upwards to half dozen wires in the switch harness. These additional wires are on older cars which ship signals to various additional controls in the vehicle such as the cruise control, ABS, traction control, shift lock control and BCM inputs. SPONSORED LINKS American made vehicles incorporate the car's blinkers into the brake calorie-free circuit. When the turn signal switch or multi role switch is operated the brake low-cal excursion is substituted for the plough bespeak circuit for either right or left directionals. European and Japanese cars have a separate light and circuit for the brake and turn signal lights. The most simple of all brake calorie-free problems is the fact that the bulbs simply burn out. This is an quick and easy gear up in most cases. We volition show y'all how to replace these bulbs further on in this guide. Every bit in any electric arrangement an open or short circuit can occur interrupting the operation of one or all of the restriction lamps. Lack of power to the brake lights can include: Through fourth dimension and usage the contacts within the brake light switch can go worn and burn out rendering the switch non operational. A bad basis in the system can cause the electrical current to back feed which makes the bulb dim or boring. A poor connection at the seedling volition make it flicker. If y'all are having the bulb replaced at a repair shop the cost can be quite reasonable, betwixt $35.00 and $55.00 (US). If you lot are going to replace the bulb yourself and save the trip to the garage which is what virtually people do the bulb will cost betwixt $5.00 and $8.00 (Us) dollars on Amazon or at the local auto parts store. If the bulbs are okay and you have an electrical problem the costs can go upwardly considerably which can range from $150.00 to $300.00 (US) for labor alone. Nosotros will bear witness you how to find these kinds of issues further down in this repair guide. Brake light bulbs should concluding up to 40,000 miles or 4 years depending on driving conditions such as stop and go traffic. When replacing lighting bulbs use loftier quality replacement parts to ensure proper operation and a longer lifespan of the repair. Cheaply made bulbs tend to fire out more than rapidly which requires a echo replacement. The electric portion of the system should exist problem free for at least 100,000 miles or eight years. SPONSORED LINKS Potential Tools and Supplies Allow'south commencement with the about popular repair which is replacing the brake calorie-free bulb and so onto troubleshooting connexion and electrical problems. Remove the bulb: At that place are basically 2 styles of bulb replacements which are; The brake lens needs to be removed to access the bulb or the bulb socket can exist removed past simply twisting information technology counterclockwise from the backside of the lens either through an access hole which is covered past a small-scale plastic console or through the trunk, lift back or hatch. We volition show you both types and how to exam the system in the post-obit guide. Have a helper step on the restriction pedal to confirm which brake bulb is out; right, left or high eye lights. If none of the lights are working then the bulbs are probably not the problem. Although we have seen where all of the bulbs have failed simply because they had gone bad one at a time in a close time frame to one other and the car owner did not notice or was not informed of the trouble by other drivers. When you see a person who has a stop light bulb out you should do the right thing and tell them. SPONSORED LINKS To brainstorm you must determine which style of bulb replacement your vehicle has. This is done past inspecting the lens and looking for mounting screws which hold the lens to the vehicle which can be on the side of the lens. You may need to open up the truck, hatch back, tailgate or lift back. If no mounting bolts are found on the outside of the lens they will be located in the inside of the rear body panel. You may need to pull back the truck liner or remove a few plastic trim pieces before these nuts or the bulb socket is accessible. If no access hole is available y'all must remove the mounting bolts and remove the lens to gain admission to the bulb. In the case below an access hole was provided by the manufacturer which makes the job a little easier. Sentry this video of the restriction light lens being removed to get an thought of how to practice the job. SPONSORED LINKS Now that you take located the light socket and wiring harness the seedling is prepare to be removed for replacement. On most American made cars and trucks this bulb has two jobs both for the brake light and the blinker indicator which will have three wires feeding the socket; brake, plow signal, and footing wire. On European and Japanese cars this task is handled separately which volition accept only two wires, brake light ability and circuit ground. Grasp the bulb socket and twist firmly counterclockwise. This will permit the socket to come up loose from the lens. Sometimes they can exist a lilliputian stuck in which case you tin can apply a pair of pliers to help break it loose. Once the socket has been removed it will expose the bulb which may have a burned marker or be calorie-free blue in colour which indicates a leak in the glass. In either case the seedling is no practiced. Grasp the bad seedling and pull it from the calorie-free socket. Some bulbs you will need to push down and twist counterclockwise. SPONSORED LINKS Matching the New Seedling: In one case the old bulb has been removed match it to the new unit of measurement, they should match identically. Pay close attention to the bulb terminals. Yous do non desire to install a 2 final bulb into the one terminal socket and visa versa. This tin create circuit back feed problems and may mayhap blow out the BCM or fuse. Install the New Bulb: Plug the new brake low-cal seedling into the socket and accept a helper push button on the brake pedal to see if information technology works. If it does reinstall information technology back into the lens and reassemble and you are all ready. If the calorie-free is still not working later replacing the bulb or it is ho-hum or dim and then more repairs are needed then continue with the guide. If a brake light flickers it's because the ability or ground is being obstructed momentarily. The most mutual cause for this is a loose fitting bulb socket. While a helper holds down on the restriction pedal move the bulb around slightly in the socket. If the bulb flickers replace or repair the socket. Also wiggle the wiring to check for opening wiring circuits. This will requite you an idea of what you're in for before you begin. And so follow down the guide to pick up on additional tips and data. SPONSORED LINKS This is where some testing and observation is needed to repair a bad connexion or broken wire. The beginning one-half of the guide will troubleshoot one brake light that is non working while the second half with troubleshoot all or the lower two brake lights. Test Brake Low-cal for Power and Ground: Secure the ground prune of a examination lite to a known good footing source such as a commodities or solid metal piece. Information technology'due south important to get a good connection complimentary from rust or paint considering the examination light depends on this conductivity to work correctly which will give y'all a good test result. Jerk the clip so the teeth of the spring loaded clip dig into the metal to ensure a proficient connection. Accept a helper hold downwards on the brake pedal the remaining working brakes lights should be on. Use a test light to probe each of the brake light sockets feed wires; one of them should calorie-free up. If you lot cannot detect power then access the opposite low-cal that is working and probe the wires until power is found to confirm the test light is working. If power is nowadays at the not working bulbs continue with the guide. If power cannot be found skip down to: "Testing Brake Low-cal Power" in this guide. If you have power at the socket the next step is to check the organisation ground. Adhere a pointed metal object to the test light clip and probe the brake light feed wire and the ground wire of the socket. If the test light lights up the excursion is working and the error is in the bulb socket connections. If the test calorie-free does not calorie-free up in that location is an open up connection in the ground wire. This will could make the bulb exist dim, wearisome or not work at all. You can either make a new ground wire connection past cutting the wire and using a new wire to any metal part virtually the socket or follow the wiring harness and look for obvious harm or cuts in the wiring that will demand to be repaired. SPONSORED LINKS Repair Bad Connections: The bulb socket could be subjected to heat and corrosion. Remove the bulb socket and audit the electrical connector for burned or melted terminals. This is caused by high resistance creating an open up connection causing the bulb not to piece of work. Manufacturers will install dielectric grease into the socket to help protect the connection just with time this clear or dark-brown grease will melt out and expose the connectors to the atmosphere causing rust or corrosion which causes a bad connection. Utilise a sharp object such as an Exacto knife to scrape the connection clean. If the connections are loose the bulb volition flicker and flash. Utilise a pocket-sized apartment blade (standard) screw driver to heighten the spring load of the terminals. This volition assistance the bulb connect to the socket making the bulb to work again. If this socket is desperately damaged it should be replaced. With all connections cleaned or socket replaced and the power and ground checked reassemble the socket and bulb onto the wiring harness. Take a helper step on the brake pedal to confirm the bulb performance. Then reinstall the bulb socket back into the lens and you are all ready. Many lighting organisation bulb clusters accept a connector which tin can melt due to poor connection which causes high resistance. This resistance tin can cause rut which melts the connector plastic creates a bad connection. The connector with pigtail will need to exist replaced which yous can get from Amazon or from the dealer for nigh $35.00 bucks. With the foot off of the brake pedal cut the harness and splice in the new connector. If the connector looks okay audit the wiring harness and look for obvious damage such as a cut or wear mark indicating the harness has rubbed against a metallic frame breaking the wire. If everything looks okay continue with this guide. This portion of the guide is to aid yous test for power when one, both lower or all three restriction lights have no power. Examination the Fuses: Use the owners manual or the lid of the fuse panel to find the restriction lite fuse. So use a test light to check the fuses for the brake light and BCM fuses and replace if whatever are blown. If the fuse is diddled information technology could exist caused by a shorted wire to ground, a melted light socket or a weak fuse. Check to see if the fuse is loose in it'due south holder which will cause a bad connection. Enhance the tension on the holder terminals to correct the trouble. If the fuse is okay continue downwardly the guide. SPONSORED LINKS Bank check the Restriction Light Switch: On newer cars using a BCM or lighting module the restriction light switch completes a basis circuit which triggers the lighting computer to supply power to the brake lights. Locate the switch near the upper part of the pedal which will have wiring connected to information technology. Begin past inspecting the wiring harness and look for obvious impairment such as a cutting, vesture mark or broken wire indicating the harness has rubbed against a metal frame causing the failure. Wiggle the wiring while pressing down on the the restriction pedal to see if the lights offset working. This would point an internal broken wire or bad switch. To test the switch utilise a test light and connect it to power and probe each of the two wires. One should be lit all the fourth dimension while the other should light upwardly when pushing the restriction pedal downwardly. If simply one side lights up the switch is bad and needs replacement. On older cars this switch controls brake low-cal power. Perform the same test using a grounded exam light. These switches are held in place past a metal clip and pin associates which makes replacement almost a 20 minute job in most cases and tin can exist replaced with just a few bones tools. When it comes to electrical devices such as brake light switches, OEM (original equipment manufacturer) the parts work better and final longer. If the switch becomes out of aligning it tin leave the brake lights on which tin can drain the bombardment down. Since the restriction light switch is used many times it will eventually demand to be replaced. A restriction lens and socket can melt and distort when the brake lights are kept on for an extended corporeality of time so try to avoid allowing the brake lights to stay on overnight. SPONSORED LINKS On vehicles using a lighting or BCM module use a wiring diagram to exam the ingoing indicate from the switch and the approachable voltage to the lights. If the BCM has a brake light input betoken from the switch and no approachable betoken the brakes lights the module is could be bad and replacement is required. If none of the lights are working check the fuse for the BCM or lighting module. Here is a typical BCM wiring diagram with power outputs going to the brake lights. They are listed as LR Turn Signal (YEL) and RR Turn Indicate (DK GRN) which are the same equally the brake lights on this car. To exam the BCM power output connected a basis test light and probe the wires to ostend power or not. (Older American Cars Only) Examination the Plough Signal Switch: On older American vehicles the brake light excursion is routed through the plow bespeak switch which can go bad not assuasive the currant flow to continue to the brake lights. Most American cars are designed with the lower brake light circuit wiring incorporated into the turn signal switch where the restriction light bulb and the turn signal bulb are one and the aforementioned. The turn indicate switch interrupts the restriction light circuit and installs the blinker circuit when the switch is activated. Using a wiring diagram test the color wires that are ingoing and outgoing to see if the circuit is working. If not replace the turn signal switch, this is sometimes called a multifunction switch. SPONSORED LINKS Here is a typical wiring diagram for a system which powers through a turn betoken switch. Again YEL (E7) and DK GRN (E6) probe these wires while belongings down the restriction pedal. They should have power and if not the switch is bad and needs replacement. You can become a wiring diagram for your automobile from an online car repair manual such as Mitchell1 or search Google Images. A dim or slow brake calorie-free is ordinarily acquired by a bad footing or having the wrong seedling installed or the terminals of the bulb have melted together every bit in the paradigm below. Remove the bulb and clean the socket terminals or supervene upon the bulb and socket together which volition facilitate a lasting repair. If y'all have whatever questions about brake lights please visit our forum. If you need motorcar repair advice, delight ask our customs of mechanics is happy to help y'all and information technology is ever 100% gratuitous. Article published 2022-02-08 How Practice Brake Lights Piece of work?
What Goes Wrong?
How Much Does Information technology Cost?
How Long Practise Restriction Lamps Last?
Getting Started
Checking and Replacing the Bulbs
Pace ane


Step 2

Step three

Watch the Video!
Brake Low-cal Not Working Later Replacing the Bulb
Pace 1


Step 2


Testing Brake Lite Power
Step 1

Step 2


Step 3


Dim Brake Lite Repair

Got Any Questions?

Source: https://www.2carpros.com/articles/brake-lights-not-working
Posted by: priceforomed.blogspot.com
0 Response to "How To Repair Leaky Brake Line Connection"
Post a Comment